| Three Hundred |
| - Index Page |
| - About... |
| - By Year |
| Collections |
| - Comp-Grid |
| - Procedural |
| - Tactics |
| - Tiny Crawl |
| - Misc |
| Previous | Mechanic #196 | Next |
This is a version of the "fishbowl"-like [#029 - Tiny Crawl World] concept, in which you indirectly influence a bunch of autonomous agents as they wander around the world. This entry, however, is a bit more hands on, as you guide a group of survivors through a zombie apocalypse, telling them how and where to find supplies, and how to go about getting them.
Basically, you run a camp for survivors, but this camp requires goods to maintain. You need food, water, bullets, tools, weapons, medicine, raw materials, skilled workers, and even stuff like toilet paper or dirty magazines. To gather these things, you send your survivors out into the world to scavenge for supplies. Failing to find them would be disastrous for the survivors.
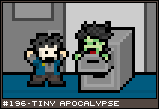
![[zombie1.png]](set10/img/entry196-zombie1.png)
Around the game world are various "dungeons", which are basically locations to scavenge for goods that have been overrun by zombies. Stuff like office buildings, hospitals, army bases, and whatever. These locations are hostile and require the survivors to tame them by defeating the zombies inside. After which, they can then search the locations for supplies.
![[zombie2.png]](set10/img/entry196-zombie2.png)
Scavenging a location is a multi-step process of taking a hostile environment and taming it. Initially, this involves dealing with the basic zombie threat. Soldiers can be sent in to fight roaming zombies, workers can barricade doors and entry points like sewer grates, back doors, and so on. Engineers can be sent in to get the generators running, providing light, and fixing things like elevators to make travel easier. Once the initial stage is complete, or complete enough (some locations are large and best tackled piece by piece), you can send in the scavengers. These guys wills search through everything for supplies, going through cupboards and closets, looking for stuff. How much they can carry is limited, so you'll also want to send in pack mule characters who can carry lots of stuff, but move slowly. Occasionally, you'll find survivors in these locations. Some will follow you out without question, while others may be so distraught that you need to send someone to calm them down and earn their trust first. Some survivors will turn against you, or ambush you to steal your supplies. Some may be hurt or secretly bitten, and need a doctor to help them first. And since survivors require goods to keep alive, you can always choose to shoot survivors you don't want.
![[zombie3.png]](set10/img/entry196-zombie3.png)
Ultimately, this is a time and resource management game. Do you send in just the soldiers to clear out a location before sending in your weaker scavengers? That's safer, but it could take several days, during which time your resources are dwindling. Do you clear multiple locations, spreading yourself thin? What if a scavenger is searching a closet and finds a zombie? If too many soldiers are at a different location, that zombie could infect half the survivors before it is taken down. A bitten survivor has two days before they turn into a zombie, and even then, there's an increasingly small chance that it wont' be that day. Do you put them down now or try to get extra days of work out of them, risking the chance of zombification? Each survivor performs a specific function, and you need to send those survivors out into the world. Send too many and you've wasted resources. Send too few and you've wasted time. Different locations require different abilities and skills, even between like locations. An office building with a mild infestation, but no working generator is going to require different survivors to tame than an office building with lights and power, but has more zombies hiding in closets and barricaded rooms full of walking dead.
There's basically two ways to control the action: environment hint flags, and focus attention.
![[zombie4.png]](set10/img/entry196-zombie4.png)
Focusing attention is just a matter of drawing a line from a survivor to something or someone else. If you focus on another survivor, that unit will go to, and follow around, the focused on survivor. If it is something that they can interact with, or search, they'll do that. Focus on a zombie and if the unit can fight, they'd attempt to defeat the zombie. If the unit can not fight, they'll avoid it. If it isn't something that can be interacted with directly, the unit will simply go there and then decide what to do next.
![[zombie5.png]](set10/img/entry196-zombie5.png)
Environmental hint flags involves dropping a flag on things in the environment. Each flag comes with an icon on it that represents a specific action, such as search, repair, guard, kill, etc. Dropping a flag on something will create a global need that any of the units available can attempt to perform. For instance, if you drop a guard flag on a door, the nearest unit not otherwise engaged will attempt to guard it. Some behaviors may require multiple units and steps, such as repairing a barricade, which entails a mule bringing wood and nails to the site and a carpenter to use his tools to repair it. The flags come in different colors, representing their level of priority. Gray flags represent low priority, which any unit can perform in any order. You need this cabinet searched, eventually. Yellow flags represent higher priority tasks - tasks that you'd like finished as soon as possible. This barricade needs to be repaired soon, so don't worry about searching that cabinet right now. And finally, you have red flags, which are immediate priority. Drop whatever you are doing and kill this zombie before he bites my only pack mule unit. The flags come from a limited pool, which means that if there are three gray search flags and you use three gray search flags, there's no more available to you. Certain actions, like repair flags, may come in an equal number of low, medium, and high priority flags, while some may only be high priority (kill) or low priority (search). Though you have a basic pool to begin with, certain units can add flags to the pool, increasing their usefulness. For instance, one unit may be particularly adept at searching, so adding him to a location increases the number of gray search flags you have available. Some units have unique flags to their class. Policemen may have blue kill flags, which are high priority flags that only apply to policemen units. Some units can place their own flags, such as spotters that will automatically place kill flags when they see a zombie. You could micromanage your units by constantly focusing their attention, but this would limit you to taming only a single location at a time. The flags are meant less to micromanage and more to supply direction and goals for an area. Their limited pool sort of forces players to think about how they are used, as well as what units to include and employ a diversity of goals and tactics at any one time.
|